You can connect metrics (either imported from a source or created manually or from aggregation of metrics) to measures to track their progress in Cascade. When the metrics are created, they'll show the historical trend of how the metric has progressed over time. The initial and target values that you set for the measure will define its expected progress.
Click the metric tile to view its information from the Sidebar:

You can connect metrics to measures in any of the following ways:
Through the Metric Library:
-
Hover the mouse over the metric tile, and click the
 (measure icon), or;
 -
Click the three dots in the metric tile, and click Connect metric to measure, or;
-
Open the metric in Sidebar view, and click the three dots. Click Add metric to measure.
Through a Measure:
-
Open the Measures tab in Sidebar view, click Edit Tracking to change the tracking type from Manual to Metric Library.
Through the Metric Library:
Before you begin: Make sure you have the plan, focus area, and the relevant objective already created in the workspace. You can connect the metric to an existing measure or create a new measure for that metric.
Access the Connect metric to measure page in one of the ways mentioned above.
Also, you need to be an Admin or someone with edit permissions on the plan to create a new measure from the metric.
-
Plan & focus area - Select the relevant plan and the focus area from the drop-down list.
-
Objective - Select the objective to which you need to associate the new measure. Once selected, the due dates of the objective will be displayed.
- Measure - Select New measure or Existing measure accordingly.
In the case of an Existing measure:
a. Select the measure from the dropdown.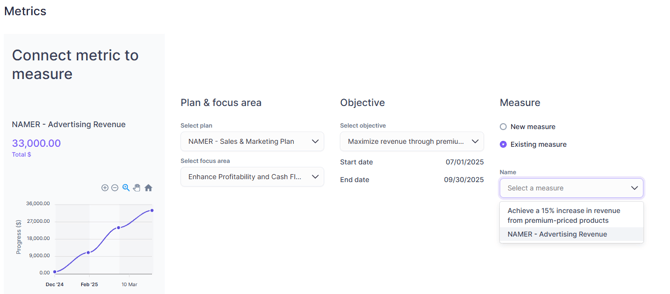
b. Confirm the details and success definition, and click on Add Metric. 
In the case of a New measure:
a. Select the type of measure and give it a proper title.
b. Select the dates and owner. You can either select the check box to have the same due dates as the associated objective, or choose your own due dates from the date picker. Remember that the dates must be within the date range of the parent objective.
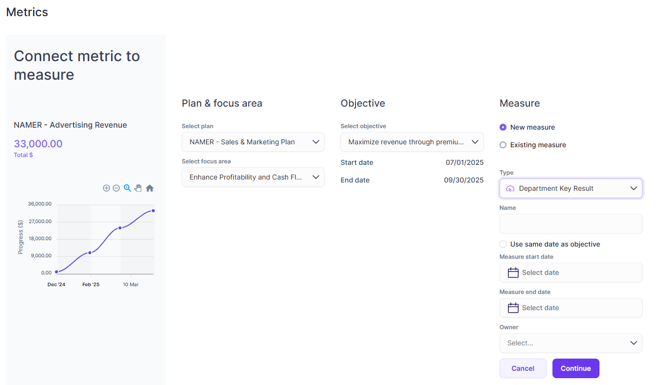
b. Click Continue.
c. Select the relevant Target type and complete the details for success definition and expected progress .
d. Click on Create Measure.
The measure will be created and displayed in the Measure Sidebar view. The metrics from which it is connected is displayed, and you can click on it to view or edit the metric details.
You can edit it to add more context like description, assign collaborators, add risks, and so on. You can also make updates, and share feedback with comments to collaborate. See The 'Sidebar' article for more information.
Through a Measure:
You can also connect an existing measure to a metric in this way - Navigate to the relevant measure, and edit it from its Sidebar:
-
Under the Tracking section, select Metrics library from the drop-down list.

-
In the Metric Name field, choose the metrics from the list.
-
Choose the Target type and set the target values to track the progress of a measure, if you haven't done so already.
If you wish to customize the tracking option of the measure, choose the relevant Maintain option from the Target type dropdown. Set the target limits and the critical limits to track and visualize the measure progress. See Maintain measures article for detailed information.
-
Expected progress - Choose the update cadence depending on when you would like to make an update. If the Send update reminders based on the expected progress schedule check-box is selected, then the owner of the measure will be notified to make updates.
- Add Custom Targets
-
Click Save.
The measure will be connected to the metrics and can now be tracked accurately. You can now pull these measures created or connected from the metrics into reports and dashboards to gain powerful insights.
When a measure is connected to a metric in a relationship (calculated or related), you can see a sub-measure relationship with those child metrics or measures connected to the relevant child metrics in the Planner page. If you wish to explore more on sub-measure feature, see Connecting Metric Trees to Measures for Submeasures.
FAQs
Is it mandatory to connect a metric to a measure?
No. But if you connect the metric to a measure, its progress can be tracked alongside its strategic objectives. From the metric, you can understand its historical trend, and then connect it to a measure with deadlines and target to track it more effectively.
Can I connect the same metric to different measures?
Yes, that's the main advantage of using metrics.
Can I add historical data points to the measure? Will they overwrite the data that was already present?
Yes. In case of manually tracked measures or measures connected to manual metrics, you can do this from their Goal hub page. In the case of measures connected to manual metrics, this'll open up the metric table. If the metric is connected to an integration, and if you wish to edit the value or add historical data points, then those need to be done in the source and not from within Cascade.
What happens if the measure's end date is passed but the metrics still has data points in the present?
If the metric has datapoints beyond the end date of the measure, it'll no longer automatically sync those data, i.e., the measure stops pulling in data from the metric once its end date is passed. You need to either change the end date of the measure or click Sync now manually every time the value in the metric changes to sync the data in the metric and the measure.